Streamlining Synapse CI/CD & Dedicated SQL pool with Azure DevOps

I work with cross-functional teams to deliver cutting-edge solutions for data and analytics projects. I leverage my expertise in cloud platforms, automation, CI/CD, data analysis, and business intelligence to build efficient DevOps pipelines, craft insightful visualizations, and optimize ML models.

Reach at : https://heylink.me/kunaldas
It is crucial to have a simplified and effective process for developing, testing, and implementing solutions as data and analytics become more and more important for enterprises. Microsoft’s cloud-based analytics solution, Synapse Analytics, has strong data warehousing, machine learning, and integration capabilities. However, without the proper equipment and knowledge, building a Continuous Integration and Continuous Deployment (CI/CD) procedure for Synapse can be difficult. Teams can automate the deployment of Synapse solutions thanks to Azure DevOps’ complete collection of CI/CD pipeline capabilities. Using Azure DevOps to streamline Synapse CI/CD, we will examine best practices and implementation advice in this article.
What is Synapse Analytics?
Microsoft created the cloud-based analytics solution known as Synapse Analytics. It is a platform that gives businesses the ability to ingest, prepare, manage, and provide data for their urgent needs in business intelligence and machine learning. Data integration, big data, data warehousing, and AI are just a few of the tools and services that Synapse Analytics integrates into a single workspace to provide a seamless end-to-end data analytics experience. The platform provides cutting-edge functions like code-free or code-first data integration, big data processing based on SQL and Spark, machine learning, and Power BI reporting capabilities. Synapse Analytics offers a single, end-to-end development and deployment experience while allowing customers to work with their current tools, languages, and frameworks.
what is the need for CI-CD for synapse analytics?
First of all, Synapse Analytics is a cloud-based analytics service that is frequently updated and added to with new capabilities. The danger of potential bugs and other problems is reduced by a well-defined CI/CD process, which makes sure that the most recent changes are integrated and tested in the current system before being deployed to production.
Second, a well-defined CI/CD procedure that guarantees seamless cooperation and effective deployment is crucial because Synapse Analytics frequently involves numerous developers working on various project components.
Lastly, A well-defined CI/CD approach also ensures that the pipeline is tested and verified at every level, resulting in greater quality, more stable solutions, and a quicker time to market. Synapse Analytics frequently entails complicated data processing and integration.
Overall, teams can manage the development and deployment of solutions more effectively while maintaining high quality and lowering the risk of errors and downtime by adopting a CI/CD process for Synapse Analytics with technologies like Azure DevOps.
What are the different components of Synapse Analytics?
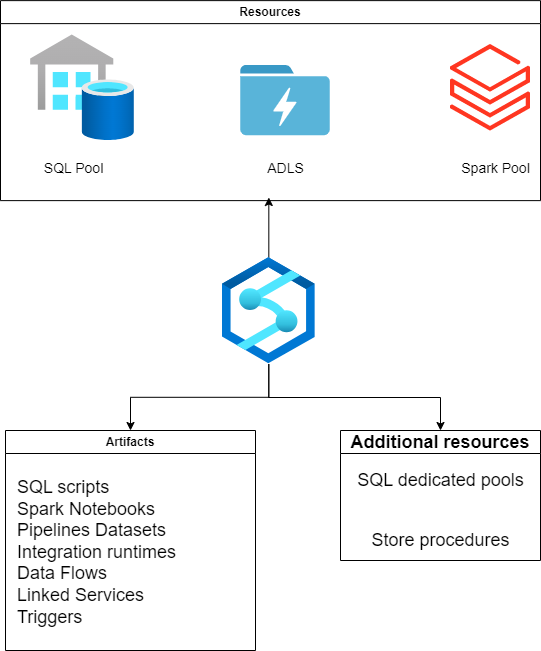
A cloud-based analytics service called Synapse Analytics consists of a number of parts that work together to offer a whole analytics solution. Synapse Analytics’ principal parts are:
Synapse Studio: A web-based integrated development environment (IDE) called Synapse Studio offers a centralized workspace for creating, overseeing, and maintaining Synapse applications. It consists of a number of technologies and services, including big data, machine learning, data warehousing, and data integration.
Synapse SQL: Users of Synapse SQL can execute SQL queries against both organized and unstructured data using this distributed SQL engine. It supports serverless and provisioned models, enables petabyte-scale data warehousing, and supports both.
Synapse Spark: Synapse Spark is a big data processing engine that enables customers to use Apache Spark to process massive amounts of data. Big data analytics, offers a high-performance computing environment that supports both batch and real-time data processing.
Synapse Pipelines: Users can design, orchestrate, and monitor data pipelines using the data integration service known as Synapse Pipelines. It can integrate data from numerous sources and supports both code-free and code-first data integration scenarios.
Synapse Serverless: Users can analyze data using SQL queries using Synapse Serverless, a serverless SQL pool, without needing to set up or maintain a specific cluster.
Synapse Dedicated SQL Pool: A dedicated cluster for high-performance data warehousing and analytics is offered via the provided SQL pool known as Synapse.
Synapse Notebooks: Users can work with code and data in a group setting using Synapse Notebooks, a collaborative notebook environment. Python, Scala, and .NET are just a few of the many programming languages it supports.
why it is hard to implement ci cd for synapse analytics?
For a number of reasons, implementing a Continuous Integration and Continuous Deployment (CI/CD) procedure for Synapse Analytics can be difficult.
First off, Synapse Analytics is a sophisticated cloud-based analytics service that combines a variety of parts and offerings, each with specific needs and dependencies. It may be challenging to develop a simplified and effective CI/CD pipeline that manages all the many components of the service due to its complexity.
Second, it can be difficult to develop a testing and deployment procedure that is quick and successful since Synapse Analytics frequently requires processing and handling massive volumes of data. It can take a lot of time to test and validate data pipelines, and handling enormous amounts of data makes it challenging to set up a testing environment that precisely mimics the production environment.
Thirdly, it can be difficult to make sure that everyone is using the most recent code and data because Synapse Analytics is frequently utilized by numerous developers and teams. Version control problems and other issues may result from this, which may slow down the development and deployment process.
Last but not least, For Synapse Analytics one needs experience in a variety of fields, including data integration, warehousing, big data, and machine learning, in order to establish a CI/CD process. Teams may find it difficult to locate the necessary skills and materials to build a reliable and effective CI/CD pipeline as a result.
Overall, For Synapse Analytics one needs to carefully prepare the implementation of a CI/CD process and have a thorough understanding of all the different parts and services involved. To build a streamlined and effective pipeline that can handle the complexity of Synapse Analytics, it’s crucial to collaborate with professionals in data engineering, DevOps, and cloud computing.
Let’s understand the CI -CD Approach:
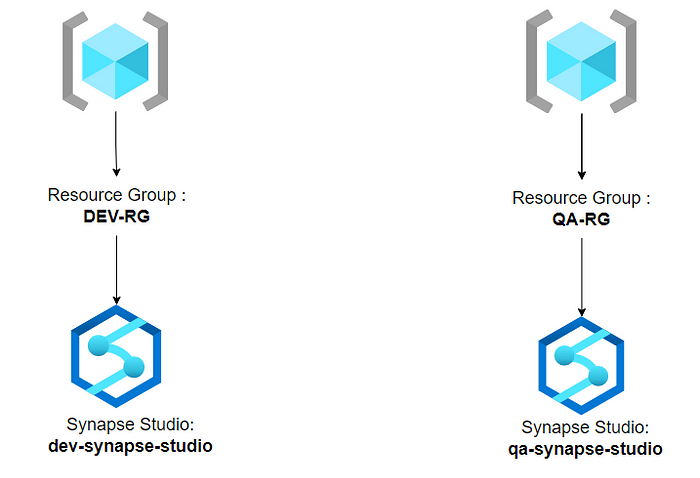
Resource Groups: Here we have two resource groups, In how enterprise we may have multiple resource groups and multiple synapse workspaces so to deploy that you can use my terraform guide which can be done very easily.
Artifacts: for artifacts deployment, I have used the ARM template deployment approach and deployed all the artifacts in that way.
The most important thing is if you have multiple artifacts linked services then you have to manually edit the ARM templates before deployment for it to work.
3. Dedicated SQL pool: The dedicated SQL pool scripts and stored procedures, views, etc also can be automated using CI-CD but I have used a secondary pipeline for the same, which makes sense as the development of the two will be asynchronous and have a different lifecycle.
Continuous Integration :
So for the example let’s think that we have two synapse workspace which represents two environments.
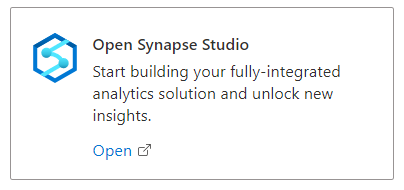
Now log into the dev synapse workspace by going to the portal and clicking on the open synapse studio dialog box
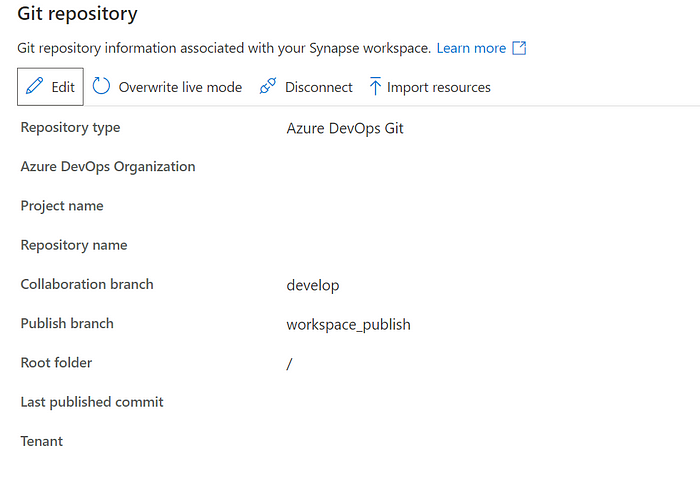
Once you are in dev synapse studio go to Settings and then GIT configuration.
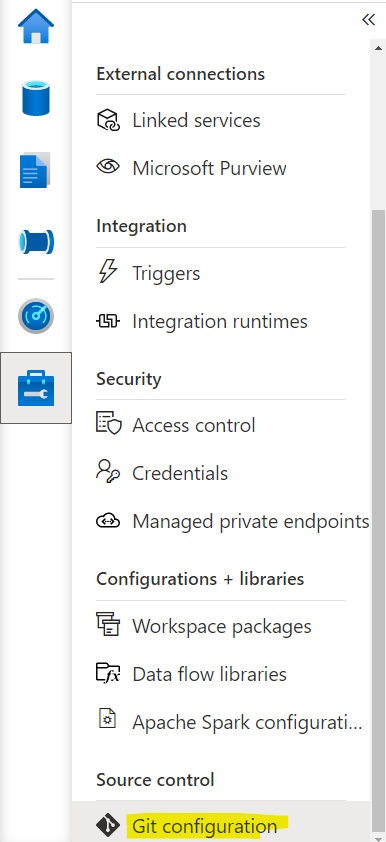
then click on ‘configure’
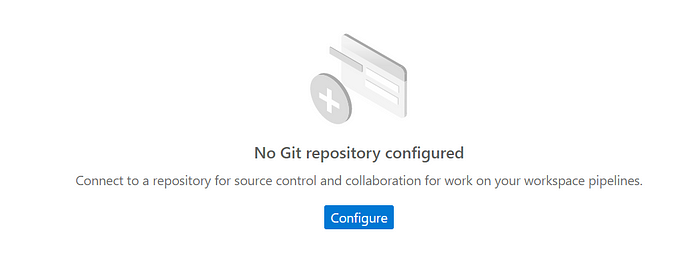
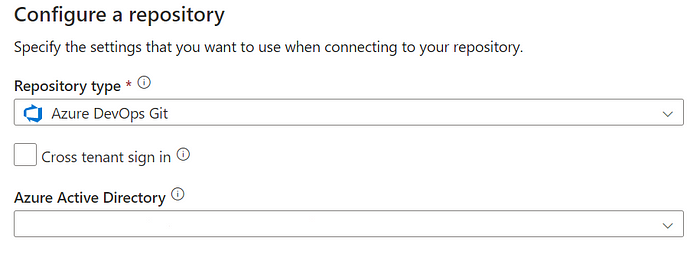
select GITHUB or AZURE DEVOPS in the repository type
Then proceed to select the collaboration branch and publish branch.
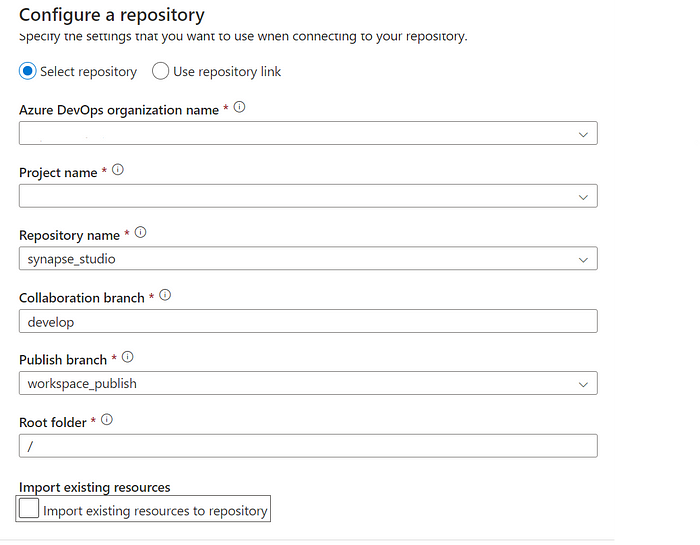
The collaboration branch and publish branch are two crucial ideas in Synapse Studio that are connected to source control and versioning of Synapse artifacts.
The collaboration branch where numerous developers can work together on a Single workspace is the collaboration branch. Usually, Synapse artifacts are developed, tested, and validated using this branch. The collaboration branch can be updated by developers after they create and modify Synapse items like pipelines, notebooks, data flows, and SQL scripts. When you establish a new workspace in Synapse Studio, the collaboration branch, which is the default branch, is automatically created.
The publish branch however does a different thing, it publishes the ARM template into that branch which contains everything in the artifact be it pipelines, notebooks, and Linked services detail everything!
Once you are done it will look something like this,
Now try to commit all and then publish

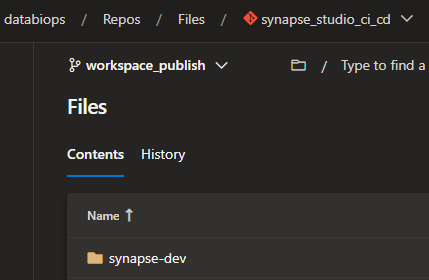
This will start generating the ARM templates and save them in the repo mentioned.
If you go to the repo you will see a folder showing your synapse workspace name which will contain two ARM templates.
the build and release concept is kind of this.
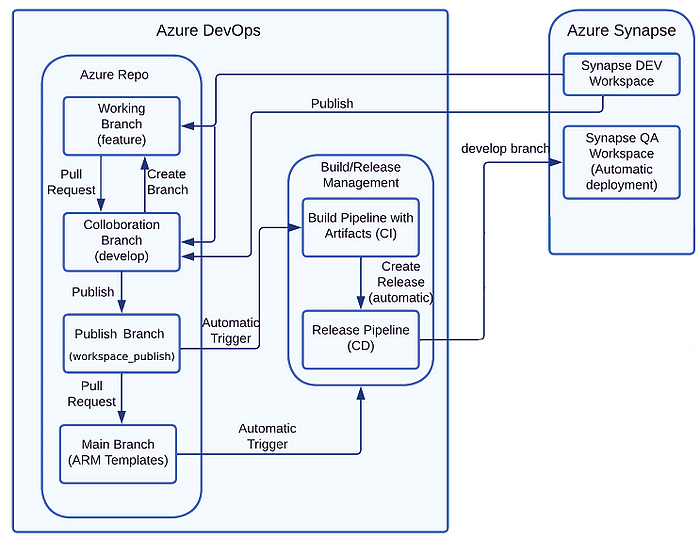
So we are using three branch policy
Develop branch: This branch would be the primary branch for developers to work on Synapse artifacts, including pipelines, notebooks, and data flows. Each developer would create their own feature branch from the develop branch, where they would make and commit their changes. When their feature is complete and tested, they would submit a pull request to merge their changes into the develop branch. The development branch would contain the latest tested changes from all the feature branches.
Feature branch: Each developer would create their own feature branch from the develop branch, where they would make and commit their changes. Feature branches are typically named after the feature or issue that they are addressing. Once a developer has completed their changes and testing, they would submit a pull request to merge their changes into the develop branch.
Main branch: The main branch would be the publish branch where you would deploy your Synapse artifacts to a live environment. The main branch would only contain the latest, tested changes that have been approved and merged from the develop branch.
In this setup, developers would use the develop branch to collaborate and integrate their changes before publishing to the main branch. This enables developers to work in parallel while maintaining a single source of truth for the Synapse artifacts. The use of feature branches ensures that changes are isolated and tested before being integrated into the develop branch. Finally, the main branch would contain only the tested and approved changes that are ready for deployment. By using this branch policy, you can help ensure that changes to your Synapse artifacts are properly tested and validated, and that version control is maintained throughout the development process.
Create a pipeline with the below code
# The pipeline copies files from workspace publish branch and publishes artifact
# @author  Kunal Das
# @version 1.0
# @since   10-11-2022
name:
    -synapse-CI-low
trigger:
- workspace_publish

pool:
  vmImage: ubuntu-22.04

steps:

- task: CopyFiles@2
  displayName: 'Copy Files to Build Pipeline directory'
  inputs:
    SourceFolder: 'synapse-dev'
    TargetFolder: '$(Build.ArtifactStagingDirectory)/ARM'

- task: PublishPipelineArtifact@1
  displayName: 'Publish Pipeline Artifact'
  inputs:
    targetPath: '$(Build.ArtifactStagingDirectory)'
    artifact: drop
This is a simplified YAML pipeline for Synapse CI/CD that has been named ‘synapse-CI-low’. The pipeline triggers whenever a Synapse workspace is published. The pipeline runs on an Ubuntu 22.04 virtual machine.
The first step in the pipeline is to copy files from a folder called ‘synapse-dev’ to a directory called ‘ARM’ in the build pipeline. This step is accomplished using the ‘CopyFiles’ task.
The second and final step in the pipeline is to publish the Synapse artifacts as a pipeline artifacts. This step is accomplished using the ‘PublishPipelineArtifact’ task. The target path for the artifacts is set to the build artifact staging directory, and the artifact is named ‘drop’.
This pipeline is a simple example of a Synapse CI/CD pipeline that copies Synapse artifacts from a source directory and publishes them as a pipeline artifact. This pipeline can be further expanded to include additional steps for building, testing, and deploying the Synapse artifacts.
Now to deploy the ARM template one extension is required, which can be added from the marketplace.
To install the extension follow these steps:
Log in to your Azure DevOps organization and navigate to the Extensions tab in the left-hand menu.
Click on Browse Marketplace to access the Visual Studio Marketplace.
Search for the extension you want to install by typing the name of the extension in the search bar.
Click on the extension from the list of results to open the extension page.
Click on the Get it free button.
Select the Azure DevOps organization where you want to install the extension and review the terms and conditions.
Click on the Install button to install the extension in your Azure DevOps organization.
Now for release, we need to add the main step:
which is workspace deployment, for that we add the below task
steps:
- task: AzureSynapseWorkspace.synapsecicd-deploy.synapse-deploy.Synapse workspace deployment@2
  displayName: 'Synpase deployment task for workspace: synapse-qa'
  inputs:
    TemplateFile: '$(System.DefaultWorkingDirectory)/_Synapse-CI-pipeline/drop/ARM/TemplateForWorkspace.json'
    ParametersFile: '$(System.DefaultWorkingDirectory)/_Synapse-CI-pipeline/drop/ARM/TemplateParametersForWorkspace.json'
    azureSubscription: 'syn-sp'
    ResourceGroupName: 'synapseQA-RG'
    TargetWorkspaceName: 'synapse-qa'
    OverrideArmParameters: '-LS_AKV_QA_properties_typeProperties_baseUrl <Synapse QA AKV URL>'
    FailOnMissingOverrides: true
This is a YAML code snippet for deploying a Synapse workspace using the Synapse Workspace Deployment task in Azure DevOps. The code contains the following steps:
The task is defined with the name ‘Synapse deployment task for workspace: synapse-qa’ and the version number of the Synapse Workspace Deployment task is set to 2.
The template and parameter files for the Synapse workspace are specified. The template file is named ‘TemplateForWorkspace.json’ and the parameters file is named ‘TemplateParametersForWorkspace.json’. These files are located in the default working directory of the pipeline.
The Azure subscription to be used for the deployment is specified as ‘syn-sp’.
The resource group name where the Synapse workspace will be deployed is set to ‘synapseQA-RG’.
The target Synapse workspace name is set to ‘synapse-qa’.
The override ARM parameters are specified using the parameter name and the new value. In this case, the parameter name is ‘-LS_AKV_QA_properties_typeProperties_baseUrl’ and the new value is 'QA-AKV-URL'.
The ‘FailOnMissingOverrides’ option is set to true, which means that the deployment will fail if any of the specified override parameters are not found.
In summary, this code snippet deploys a Synapse workspace to the specified Azure subscription, resource group, and Synapse workspace name. The override ARM parameters allow you to customize the deployment settings for the workspace.
if you notice when we deploy the ARM template we need to change somethings like
1 . Sql pool name
2. Linked Services details
3. Spark pool name
If you have the same name for all these then you may not have to tinker with the ARM template but for others before running the above deployment step we need to modify these.
steps:
- task: PythonScript@0
  displayName: 'Change SQL Pool'
  inputs:
    scriptSource: inline
    script: |
     search_text = 'synapsesqlpooldev'
     replace_text = 'synapsesqlpoolqa'

     with open(r'$(System.DefaultWorkingDirectory)/_Synapse-CI-pipeline/drop/ARM/TemplateForWorkspace.json', 'r') as file:
         data = file.read()
         data = data.replace(search_text, replace_text)
     with open(r'$(System.DefaultWorkingDirectory)/_Synapse-CI-pipeline/drop/ARM/TemplateForWorkspace.json', 'w') as file:
         file.write(data)
     print("SQL pool changed")
This is a YAML code snippet for a PythonScript task in Azure DevOps. The task changes the name of a SQL pool in an ARM template file for a Synapse workspace deployment. The code contains the following steps:
The task is defined with the name ‘Change SQL Pool’ and the task version is set to 0.
The script source is set to ‘inline’, which means that the script is written in the YAML file directly.
The Python script is defined, which replaces the search text ‘synapsesqlpooldev’ with the replacement text ‘synapsesqlpoolqa’ in the ARM template file.
The ARM template file is read and its contents are stored in the ‘data’ variable.
The ‘replace’ method is used to replace the search text with the replacement text.
The modified data is written back to the ARM template file.
A message ‘SQL pool changed’ is printed to the console.
In summary, this code snippet uses a Python script to modify the ARM template file for a Synapse workspace deployment by changing the name of a SQL pool from ‘synapsesqlpooldev’ to ‘synapsesqlpoolqa’. The modified ARM template file is used in the subsequent tasks for deploying the Synapse workspace.
The same kind of scripts can use for Spark pool and linked services as well.
If you want to use Powershell here is the command
Let us change the linked Azure KeyVault for the same.
(Get-Content -path $(System.DefaultWorkingDirectory)/_Synapse-CI-pipeline/drop/ARM/TemplateForWorkspace.json) -replace 'LS_AKV_DEV','LS_AKV_QA' | Set-Content -Path $(System.DefaultWorkingDirectory)/_Synapse-CI-pipeline/drop/ARM/TemplateForWorkspace.json


(Get-Content -path $(System.DefaultWorkingDirectory)/_Synapse-CI-pipeline/drop/ARM/TemplateParametersForWorkspace.json) -replace 'LS_AKV_DEV','LS_AKV_QA' | Set-Content -Path $(System.DefaultWorkingDirectory)/_Synapse-CI-pipeline/drop/ARM/TemplateParametersForWorkspace.json
The first command replaces the string ‘LS_AKV_DEV’ with ‘LS_AKV_QA’ in the contents of the ARM template file named ‘TemplateForWorkspace.json’.
The second command replaces the same string in the contents of the ARM template parameter file named ‘TemplateParametersForWorkspace.json’.
The ‘-path’ parameter specifies the file path for each file, which is set to the default working directory in the build pipeline.
The ‘-replace’ parameter is used to search for the specified string and replace it with the replacement string in each file.
The ‘|’ (pipe) character is used to send the modified contents to the ‘Set-Content’ command, which writes the modified contents back to the same file.
The modified ARM template files are used in the subsequent tasks for deploying the Synapse workspace.
In summary, this PowerShell script code uses the ‘Get-Content’ and ‘Set-Content’ commands to modify the contents of two ARM template files for a Synapse workspace deployment in Azure DevOps. The ‘replace’ parameter is used to replace a string in each file, and the modified files are used in the subsequent deployment tasks.
Now if you have some triggers in the synapse workspace it will not deploy as before deployment triggers must be turned off, to achieve this we can add the below task just before deployment
steps:
- task: AzureSynapseWorkspace.synapsecicd-deploy.toggle-trigger.toggle-triggers-dev@2
  displayName: 'Toggle Azure Synapse Triggers'
  inputs:
    azureSubscription: 'syn-sp'
    ResourceGroupName: 'Synapseqa-RG'
    WorkspaceName: 'synapse-qa'
    ToggleOn: false
This pipeline step uses the Azure Synapse CI/CD extension to turn off triggers for a Synapse workspace. The task is named “Toggle Azure Synapse Triggers” and the version being used is 2. The task has several inputs including:
azureSubscription: The Azure subscription that contains the Synapse workspace.
ResourceGroupName: The name of the resource group where the Synapse workspace is located.
WorkspaceName: The name of the Synapse workspace where the triggers will be turned off.
ToggleOn: A boolean value indicating whether to turn on or off the Synapse triggers. In this case, it is set to false, meaning the triggers will be turned off.
Once you do all these steps you are finally ready to deploy the synapse workspace!!!
let’s look at the high-level workflow of the things we have done so far!
Developers create or modify Synapse artifacts, such as notebooks, and pipelines, in the development environments.
The changes are pushed to a source control repository, such as Azure DevOps Repos, GitHub, or Bitbucket.
A build pipeline is triggered, which compiles the changes, and creates an artifact, such as an ARM template.
The artifact is published to a release pipeline, which deploys it to the Synapse workspace.
The deployment process may involve creating or updating Synapse artifacts, deploying resources to Azure, and configuring the Synapse workspace.
After the deployment is completed, the triggers for Synapse pipelines, notebooks, and triggers may need to be toggled on or off.
If any issues are found during testing, the pipeline may be rolled back or the code may be fixed and re-deployed.
But this whole CI-CD pipeline will take care of the spark notebooks pipelines and additionally the Linked services and IRs as well but one major thing is the Stored procedures views etc from the dedicated SQL pool, we need some way to publish these changes can be taken care of by using a second Pipeline,
CI-CD for dedicated SQL pool
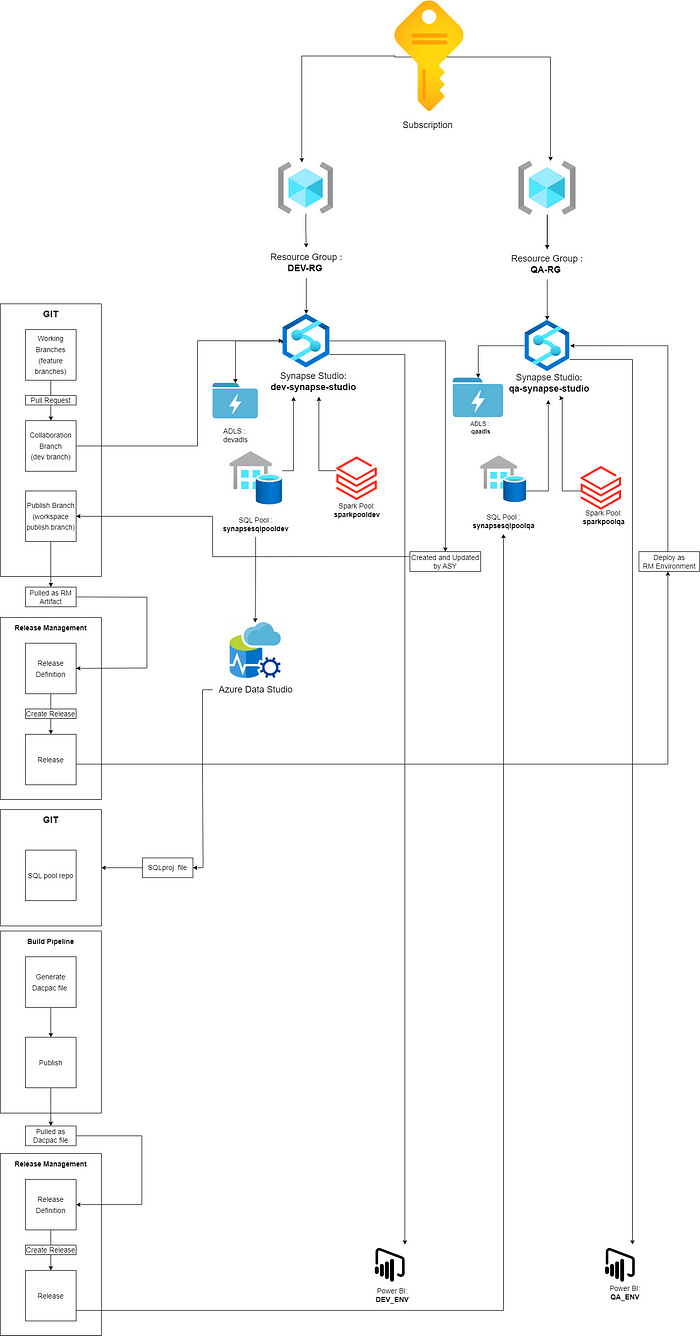
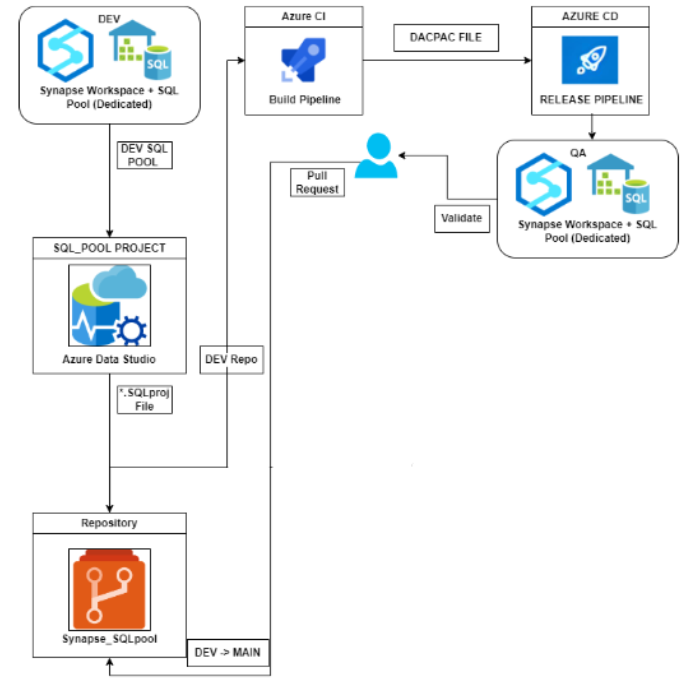
Let’s look at the high-level workflow
Sure, here’s a detailed explanation of the CI/CD workflow for a dedicated SQL pool using Azure Data Studio:
Connect to dedicated SQL pool: First, connect to the dedicated SQL pool using Azure Data Studio. This can be done by selecting the dedicated SQL pool in the Object Explorer and providing the necessary login credentials.
Create a project: Once connected, create a new project in Azure Data Studio by selecting File -> New Project. Choose the appropriate project type based on the requirements of the dedicated SQL pool.
Add source control: Add the project to a source control repository such as Git by selecting View -> Source Control and following the prompts to initialize the repository and commit the project.
Build pipeline: Create a build pipeline in Azure DevOps that takes the *.sqlproj file from the source control repository and builds a DACPAC file using the vsbuild Task. This task compiles the SQL scripts and T-SQL code into a single package that can be deployed to the dedicated SQL pool.
Release pipeline: Create a release pipeline in Azure DevOps that deploys the DACPAC file to the next environment, such as the QA environment. This can be done using the dacpac Deploy Task. This task deploys the DACPAC file to the specified SQL Server instance or dedicated SQL pool, and can also handle any necessary pre- or post-deployment scripts.
Here is the complete workflow diagram of the same.
First, let’s setup the repository for the SQL pool
Create or use an existing Azure DevOps project.
Click on Repos from the sidebar.
Click on New Repository and fill in the necessary details, such as the repo name. In this case, the repo name used in this example is “Synapse_SQLpool”. Click on Create.
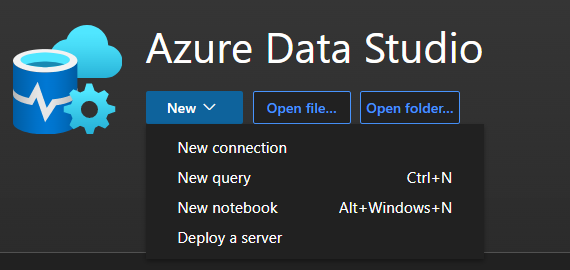
Configure Azure Data Studio (ADS) to connect to the above-created repository. Open ADS and select the New Connection option from the welcome page.
5. A new pop-up window will come, here put all the details required for the connection.
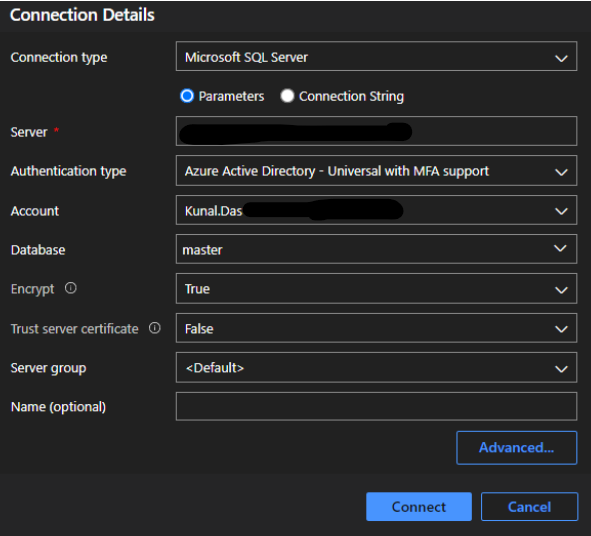
6. Click on connect and then wait for the browser window to come on screen, here u can normally log in with your azure credentials and after successful login, you will be redirected to the data studio.
7. At this point if you click on the Connections side pane on the left you will definitely see the connection sub menu there,

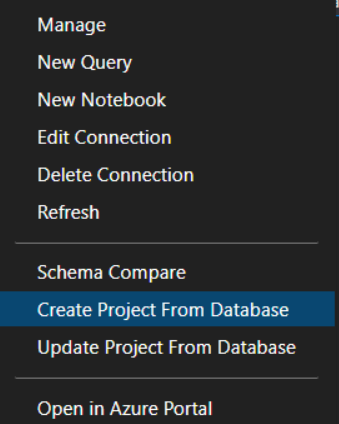
Now select the server connection from here and then right-click and select ‘create project from database’ option,
Keep the settings as shown in the below image but select the folder and project name appropriately.
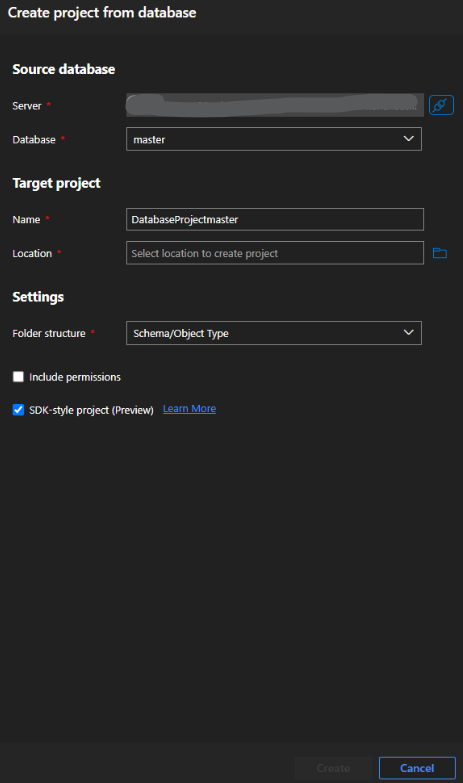
- Once you are done with it you will see a project from the left side pane
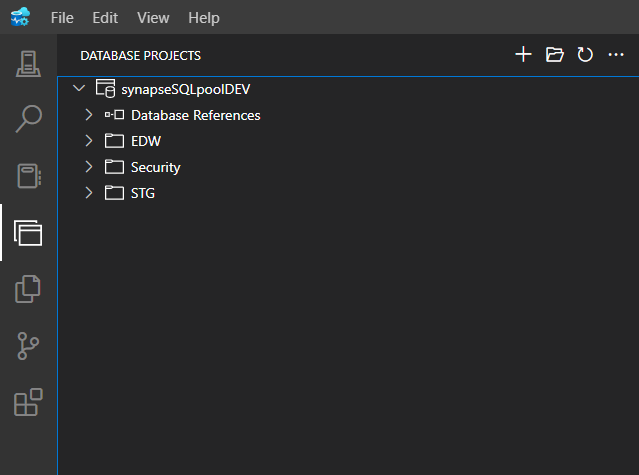
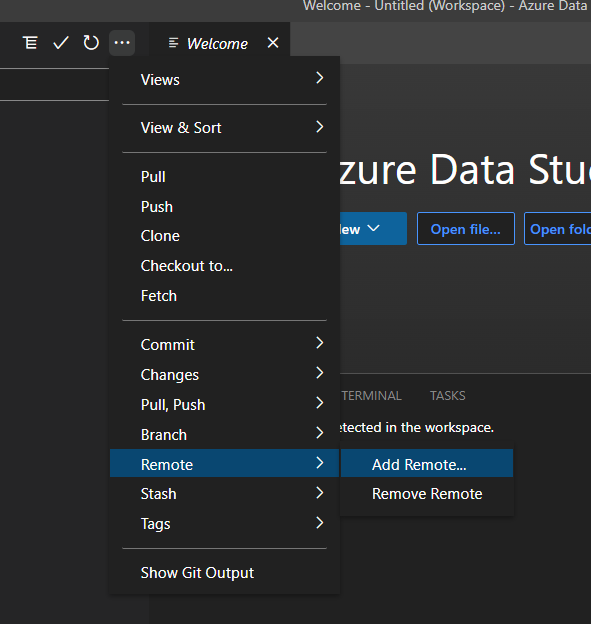
Now the only step is to add the project to the Azure repo, there are plenty of ways we can do that, but here inside Azure Data studio itself, you can do the same by going into the left pane source control option.
Click on the three-dot menu and then select the add remote option,
Here u just have to put the azure repo link, if it fails somehow open the terminal by pressing “ctrl + `” and then run the git init command which will initialize the directory,
Once u put the azure repo link whatever changes are there in your project can be pushed to the azure repo easily.
Verify the remote repo by the command ‘git remote -v’
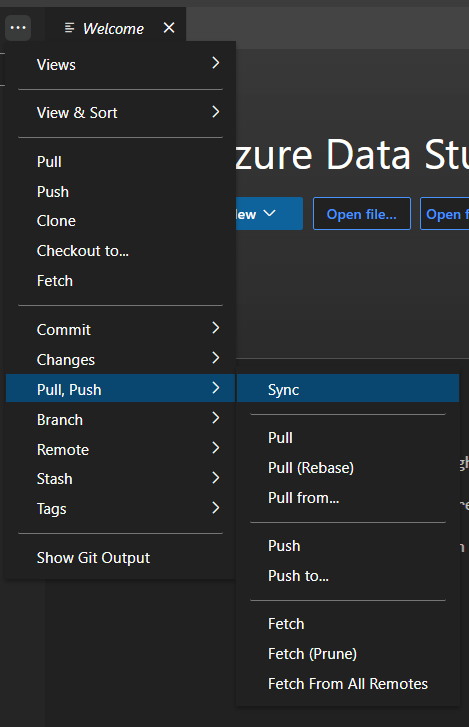
The Sync option can also be used as it will automatically pull and then push the repo from the azure repo to the local system,
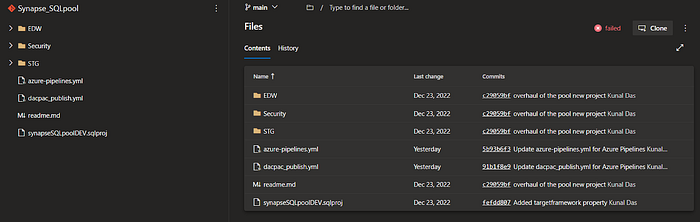
Open the azure repo and navigate to your repo and see the files updated,
Now we have to create a build pipeline for that,
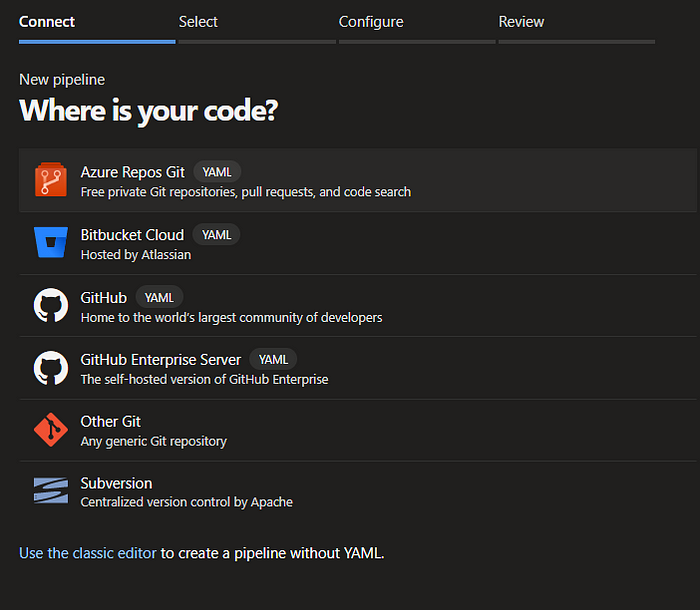
go to pipeline and a new pipeline,

select Azure repo and locate your repository.
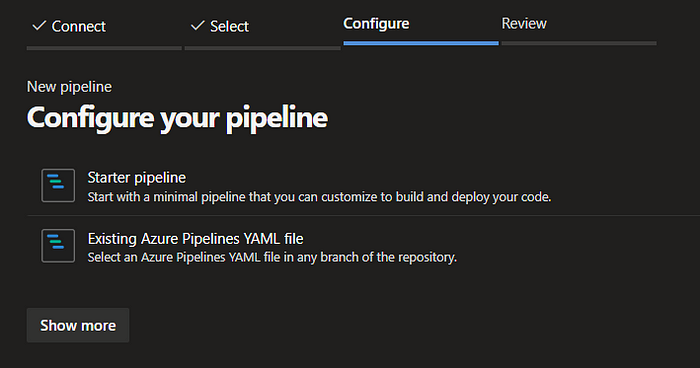
- The third step would be just selecting the starter pipeline option.
- Then in the yaml file paste the below code,
# @Author : Kunal Das
# Date : 30-12-2022


variables:
  poolstagingarea: $(Build.ArtifactStagingDirectory)\poolstaging
  BuildConfiguration: release
  SQLPoolartifactname: AzureSQLPool
  SQLPooldacpacfile: $(System.ArtifactsDirectory)\$(SQLPoolartifactname)\synapseSQLpoolDEV.sqlproj


trigger:
- main


pool:
  vmImage: windows-2019


stages:


- stage: Pooldacpac
  displayName: 'Build dacpac'


  jobs:
    - job: 'Builddacpac'
      displayName: 'Build SQL Pool dacpac'

      steps:
      - task: VSBuild@1
        displayName: 'Builds the dacpac'
        inputs:
          solution: synapseSQLpoolDEV.sqlproj
          configuration: $(BuildConfiguration)


      - task: PublishBuildArtifacts@1
        displayName: 'Publishes dacpac as an artifact'
        # Publishes the dacpac as part of an artifact within Azure DevOps
        inputs:
          PathtoPublish: 'bin\$(BuildConfiguration)'
          ArtifactName: $(SQLPoolartifactname)
          publishLocation: 'Container'
And Done! The build pipeline is ready, you may notice I have given the main branch as a trigger at the top so every time someone updates the main branch it triggers the main pipeline.
Save and run the pipeline, you can see all jobs running perfectly!!!
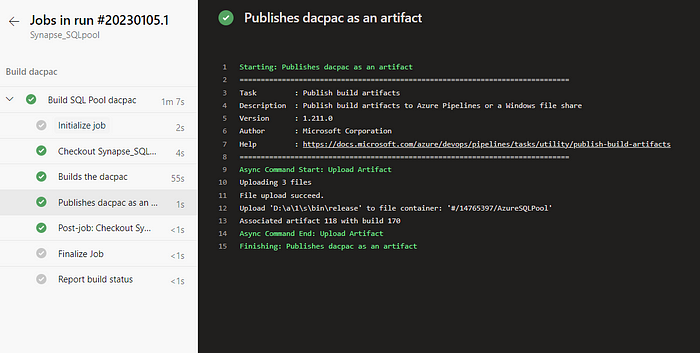
- Click on the pipeline and see the job artifact in this case the dacpac file has been published.

IMPLEMENTING THE RELEASE PIPELINE TO DEPLOY THE ABOVE-GENERATED BUILD ARTIFACTS
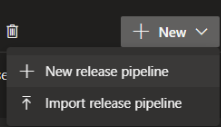
- Now the release pipeline can be created easily by going to pipeline -> release and then selecting create new release pipeline.
- Go to the pipeline and add just one task “SQL dacpac deployment”
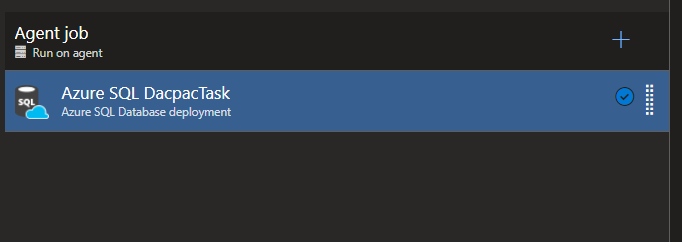
- This task just points to the QA or the next environment and then just takes the dacpac file to deploy it in the next environments.
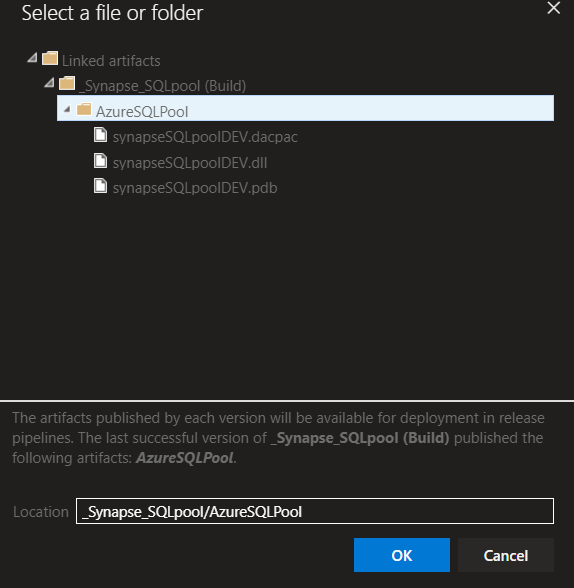
Then locate and select the dacpac file.
Pass an additional argument in the field Additional SqlPackage.exe Arguments as /p: BlockOnPossibleDataLoss=false
Just save and run the pipeline.
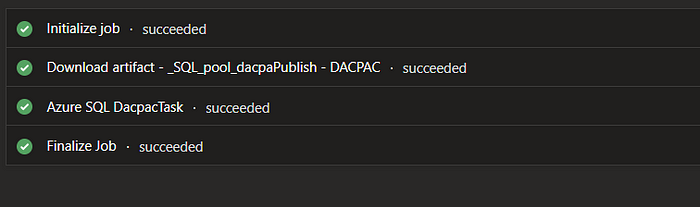
The job will run and deploy the changes to the next environment,
In conclusion, the effectiveness and collaboration of data engineering and BI projects can be significantly enhanced by connecting Azure DevOps with Azure Synapse Analytics workspace. You may connect your Azure DevOps project with your Synapse workspace by following the instructions in this article, which will also help you optimize your CI/CD pipeline for better data asset distribution and maintenance. To ensure a seamless and successful implementation, it is crucial to test carefully and make any necessary adjustments. Your firm can benefit from a smooth DevOps and data analytics process with proper design and implementation.
Read my blogs:


Connect with Me:


